Difference between revisions of "Software Configuration"
ZexisStryfe (talk | contribs) (Created page with "<noinclude>Category: Getting Started Templates</noinclude> <div id="recentevents-holder" class="mw-fp-lft-modwrap"> <div class="mw-main-headline" style="margin-left:1px;">...") |
ZexisStryfe (talk | contribs) |
||
| Line 12: | Line 12: | ||
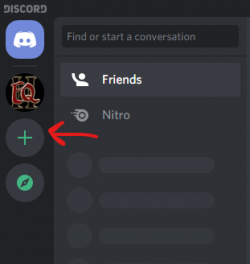
# Along the left hand side is a list of Discord servers. Click on the plus sign to add a discord server. [[Image:Discord1.png|250px]] | # Along the left hand side is a list of Discord servers. Click on the plus sign to add a discord server. [[Image:Discord1.png|250px]] | ||
# Select the "Join a Server" option from the pop-up window. [[Image:Discord2.png|250px]] | # Select the "Join a Server" option from the pop-up window. [[Image:Discord2.png|250px]] | ||
| − | # Enter your invite code (This will be provided by the DM during your character creation session) and click "Join". | + | # Enter your invite code (This will be provided by the DM during your character creation session) and click "Join". [[Image:Discord3.png|250px]] |
<br clear="all" /> | <br clear="all" /> | ||
</div> | </div> | ||
</div> | </div> | ||
Revision as of 09:01, 17 June 2020
Discord Configuration
Download and Install
- Go to Discord and create an account if you do not already have one by clicking the Login button in the upper right.
- Select register and complete the form to create your account.

- Download the Discord software from the site's main page and install to your local computer.
- Once installed, Discord should start up automatically. If it doesn't run the application from your start menu.
- Log in to the application with the account you created in step 2.
- Along the left hand side is a list of Discord servers. Click on the plus sign to add a discord server.

- Select the "Join a Server" option from the pop-up window.

- Enter your invite code (This will be provided by the DM during your character creation session) and click "Join".

